

How To Repair Epoxy Resin Top Coat On Stained Wood Floors
Bound to topic
Dispensing, Measuring & Mixing
Epoxy Cure Stages
Preparing Surfaces for Adhesion
Concluding Finish Topcoats
Dispensing, Measuring & Mixing
Epoxy Resin and Hardener
Careful measuring and thorough mixing of epoxy resin and hardener are essential for epoxy to cure properly. Check the hardener characterization or the technical data sheet for the correct mix ratio of resin to hardener. Whether you lot're applying the epoxy mixture to wet out fiberglass, every bit a coating or a casting, the post-obit steps will ensure a controlled and thorough chemical transition to a high-strength epoxy solid.
If this is your first time using an Entropy Resins epoxy product, begin with a pocket-sized test batch to get a feel for the mixing and curing process before applying epoxy to your project. This way, yous'll get a good understanding of the epoxy's open (or workable) fourth dimension for the temperature yous're working in, and ensure that you're properly metering the resin and hardener ratio. Mix pocket-size batches until you're confident of the mixture's treatment characteristics, and considering epoxy kicks off faster in larger, contained batches. Information technology'south likewise a expert idea to review epoxy safety protocols.
Dispensing Resin and hardener
Dispense the right proportions of resin and hardener into a clean plastic, metallic, or wax-complimentary paper container. Don't utilize glass or cream containers considering of the danger of exothermic heat buildup. Do non attempt to arrange the epoxy cure time by altering the mix ratio. An accurate ratio is essential for the epoxy to fully cure and develop its physical backdrop.
Dispensing with Pumps
Resin and hardener dispensed at the incorrect ratio is the source of most cure-related issues. To simplify dispensing and reduce the possibility of errors, use Entropy Pumps to meter the correct ratio of resin to hardener.
Pump two total pump strokes of resin for each full pump stroke of hardener. Depress each pump caput fully and allow the head to ascension completely back to the summit before beginning the next stroke. Partial strokes will requite the wrong ratio. Read the pump instructions earlier using the pumps.
Before you use the beginning pump-dispensed mixture on a projection, verify the pumps are delivering the correct ratio past following the calibration process on the pump instructions. Recheck the ratio someday you experience bug with curing.
MEASURING by Weight or Volume
When not using pumps, you'll demand to measure Entropy resins and hardeners by weight or book to achieve the correct ratio of 2-parts resin to ane-office hardener.
Volume
To reach the right 2:i mix ratio past volume, simply measure out 2 parts resin to 1 role hardener before mixing the components.
Weight
The verbal weight measurement for these ratios is slightly different from the volume ratio due to resin and hardener density. Encounter the hardener characterization or technical information canvass for the weight ratio of the resin and hardener combination you're working with, and apply a scale to measure the desired weight. Datasheets tin be found in the "PDF" tab on each product's description page on this website.
Mixing Resin and Hardener
Using a stir stick, blend properly metered resin and hardener for at to the lowest degree one full minute. Be sure to scrape the sides of the mixing container.
Epoxy Cure Stages
Mixing epoxy resin with a hardener begins a chemic reaction that transforms the combined liquid ingredients into a solid. This period of transformation is the cure fourth dimension. Equally information technology cures, epoxy passes from the liquid state, through a gel land, earlier it reaches a solid-state (Figure 1).
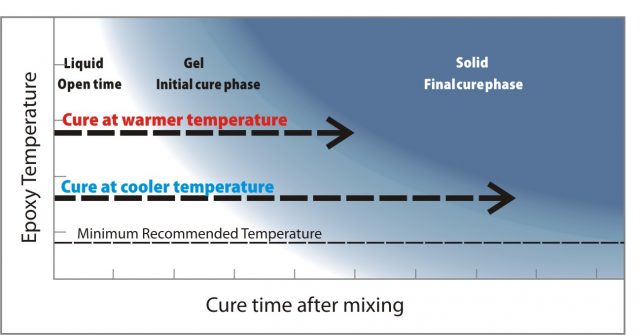
Liquid―Open up Fourth dimension
This phase is also called working fourth dimension or wet lay-up fourth dimension. Information technology is the portion of the cure time, later on mixing, that the epoxy mixture remains a liquid and is workable. Practise all associates and clamping during the open time to ensure a undecayed bail.
Gel—Initial Cure Phase
The epoxy passes into an initial cure phase when it begins to gel, or "kick-off." The epoxy is no longer workable and will progress from a tacky, gel consistency to the firmness of hard prophylactic, which you volition be able to dent with your thumbnail. The mixture will get tack-free most midway through the initial cure phase. While the epoxy is still tacky, about the tackiness of masking tape, you may still bail to or recoat the surface without surface preparation equally the two layers will form a chief (chemical) bond. However, be sure it's at the proper tackiness equally the potential for a chemical bond diminishes as the mixture approaches the final cure phase.
Solid—Final Cure Phase
The epoxy resin and hardener mixture has cured to a solid state and you can dry sand information technology. You lot volition no longer be able to dent it with your thumbnail. At this point, the epoxy has reached virtually of its ultimate strength, so it'southward fine to remove whatsoever clamps. A new application of epoxy volition no longer be able to form a chemical (or principal) bail to it. Before applying more epoxy, you must clean, dry, and sand the surface to facilitate a skilful secondary (mechanical) bond. Run across Surface Preparation for details. The mixture will go on to cure for the next several days to two weeks at room temperature (77°F or 22°C), becoming an inert plastic solid.
Epoxy Temperature and Curing
The warmer the temperature of curing epoxy, the faster it cures. Three things contribute to epoxy'due south temperature:
- The general surrounding temperature of your piece of work expanse, or ambient temperature.
- The temperature of the surface you've applied the epoxy to, which is too a part of ambient temperature.
- The heat the epoxy generates equally it cures, or exothermic oestrus.
To adapt to warmer temperatures, use a slower hardener to increase or maintain your open up time. You can also mix smaller batches and use them upwardly quickly. Or pour the epoxy mixture into a container with greater surface area (such as a roller pan) to let exothermic heat to dissipate, extending open fourth dimension. The sooner the mixture is transferred or applied (after thorough mixing), the longer the mixture'south bachelor open fourth dimension for blanket, lay-upward, or assembly.
In cool atmospheric condition, use a faster hardener or utilize supplemental heat to raise the epoxy temperature in a higher place the hardener's minimum recommended application temperature. Use a hot air gun, a heat lamp, or another heat source to warm the resin – before mixing or after the epoxy is practical. Do not heat hardeners prior to mixing with resins. You tin speed the epoxy cure time by applying supplemental oestrus to the curing epoxy.
Notes
- An unvented kerosene or propane heater can inhibit the cure of epoxy and contaminate epoxy surfaces with unburned hydrocarbons.
- Entropy CPM Compression Molding epoxy formulations crave a minimum elevated cure temperature of 150°F (65°C) to reach a proper cure and optimal mechanical properties. Review the instructions for CPM before use.
How Volume Affects Exothermic Reactions
Epoxy cures through an exothermic reaction. This means that as the molecules react they generate oestrus. The corporeality of heat depends on the thickness of the epoxy mass or the exposed surface area of mixed epoxy. A thicker mass retains more than oestrus, causing a faster reaction and even more heat.
Several inches of mixed epoxy in a confined mass (such as a mixing loving cup) can generate plenty heat to melt a plastic cup, burn your skin or ignite combustible materials if left to stand up for its full pot life. Enclosing curing epoxy with foam or other insulating materials tin have a similar effect. If uncontrolled, the exothermic rut of the epoxy can also cause the epoxy to start smoking, plow dark yellow/orange, and crack. For these reasons, do not utilize foam or glass mixing containers or cascade the epoxy into confined spaces in thick applications. If you spread the same epoxy quantity into a sparse layer, exothermic heat will dissipate. The ambient temperature will decide the epoxy'due south cure time. The thicker the layer of curing epoxy, the more than exothermic rut will impact it, and the faster it will cure.
If a pot of mixed epoxy begins to exotherm (estrus up) out of control, quickly move it outdoors and abroad from anything combustible. Avoid breathing the fumes. Practise non dispose of the mixture until the reaction is complete and has cooled.
It is possible to make thick castings with our Clear Casting Epoxy (CCR). Run across Casting Epoxy for complete instructions.
Hardener Cure Speed
Each Entropy Resins epoxy product pairs a resin with at to the lowest degree two different speed hardeners. As described above, the open up time dictates the time available for mixing, application, smoothing, shaping, assembly, and clamping. Cure fourth dimension dictates how long you must wait before removing clamps, or before you tin sand or go on to the next pace in the project. Ii factors determine an epoxy mixture's open time and overall cure fourth dimension—hardener cure speed and epoxy temperature.
Each hardener has an ideal temperature cure range. At any given temperature above the minimum-utilise temperature, each resin/hardener combination will become through the aforementioned cure stages, only at unlike rates. Select the hardener that gives you acceptable working time for the job you are doing at the temperature and conditions yous are working under. Review the technical datasheet for data on pot life and cure fourth dimension for each organization.
Pot life is the corporeality of time a specific mass of mixed resin and hardener remains a liquid at a specific temperature (a 100g-mass mixture in a standard container, at 77°F or 25°C). Pot life is how we compare the cure speeds of different hardeners. A "fast" hardener in one epoxy conception may have a much different pot life than a "fast" hardener in some other epoxy formulation. Because pot life is a measure of the cure speed of a specific independent mass (volume) of epoxy rather than a thin film, a hardener'due south pot life is much shorter than its open up time.
Preparing Surfaces for Adhesion
Applying epoxy successfully depends on both the strength of the epoxy and on how well it adheres to the surface you've practical it to. There are two types of epoxy bonds: primary chemical) bonds and secondary (mechanical) bonds. Except when bonding to uncured or partially cured epoxy surfaces, all epoxy bonds are secondary bonds.
Surface Preparation
For adept secondary (mechanical) adhesion, bonding surfaces should be:
- Make clean—Bonding surfaces must be free of any contaminants such as grease, oil, wax, or mold release. Make clean contaminated surfaces with lacquer thinner, acetone, isopropyl alcohol, or another appropriate solvent. Most foams volition exist damaged past solvent, so water may be the all-time pick for foam. Wipe the surface with white paper towels before the solvent dries. We recommend paper towels because rags may incorporate contaminants such equally detergent or cloth softeners that solvents will transfer to the surface. Shop Make clean surfaces before sanding to avoid sanding the contaminant into the surface. Follow all safety precautions when working with solvents.
- Dry out—All bonding surfaces must be every bit dry out as possible for good adhesion. If necessary, accelerate drying by warming the bonding surface with a heat gun, hairdryer, or rut lamp. Employ fans to move the air in confined or enclosed spaces. Watch for condensation when working outdoors or whenever the temperature of the work environment changes.
- Sanded—Sand bonding surfaces to thoroughly abrade them. 80-grit aluminum oxide paper will provide a skilful texture for the epoxy to "fundamental" into. Be sure the surface you lot're bonding to is solid. Remove whatsoever flaking, chalking, baking, or old blanket earlier sanding. Remove all dust after sanding. Use a vacuum, or a microfiber textile slightly damp with water to remove whatsoever sanding dust. Allow wet surfaces to air dry thoroughly or employ rut or a fan to speed drying.
Primary (Chemical) Bonds
Principal, or chemical, bonds occur when y'all apply fresh epoxy over partially cured epoxy. Primary bonding relies on the chemical bonding of epoxy layers where resin and hardener molecules from the previous layer are even so reacting and can therefore chemically react with the side by side epoxy layer. This allows all the epoxy layers to cure together and fuse into a single layer.No surface prep is needed when applying fresh epoxy over partially cured epoxy. But after an epoxy awarding cures, the window for chemic linking closes. At this point, you'll demand to set up the surface for subsequent epoxy coats.
Secondary (Mechanical) Bonds
Secondary, or mechanical, bonds occur when you first utilise epoxy to a substrate, or when you are applying subsequent coats over an epoxy coating that has fully cured. Secondary bonds rely on the epoxy'south power to "key" into pores or scratches in the surface and so these bonds are mechanical in nature.
When y'all properly prepare the surface for a secondary (mechanical) bond, it volition be clean and textured. This allows for skillful adhesion.
The following 3 steps of surface training are a critical role of whatever secondary (mechanical) bonding functioning.
Preventing Adhesion
Sometimes you don't want the epoxy to bond to a sure surface, such as a mold surface. Materials/substrates the epoxy does not adhere to are: articulate cellophane record, thin plastic motion picture three to 5 mils, polyethylene plastic, and polypropylene plastic. You can as well use mold release agents similar paste wax, chemical release, and PVA (polyvinyl alcohol) to forbid bonding. To verify that the epoxy will release from the surface, we recommend trying it on a examination piece/area.
Removing Amine Blush
Amine blush is a by-product of the epoxy curing process. This wax-like film may start to grade during the tack-gratuitous stage of the initial cure phase. The chroma is water-soluble and easy to remove but can clog sandpaper and inhibit subsequent bonding if not removed.
Simply launder the surface with clean water and an abrasive pad. We recommend iii-Thousand Scotch-Brite™ 7447 General Purpose Paw Pads. Dry the surface with plain white newspaper towels to remove the dissolved blush before it dries on the surface. After you lot launder it with the abrasive pad, the surface should appear dull. Sand any remaining glossy areas with 80-dust sandpaper. Wet-sanding will too remove the amine blush.
Final End Topcoats
The nigh of import thing to consider when choosing a stop coating is protecting the epoxy from sunlight. Long-term UV protection depends on how well the end coating itself retains its UV filters or pigments over the epoxy blanket. A loftier-gloss stop reflects a higher proportion of the light hitting the surface than a deadening surface. All other things existence equal, a white (especially a glossy white) coating will last the longest.
Some of our Entropy systems, including BRT, CLR, and CCR, accept UV stabilizers to help retain gloss and clarity. However, for best long-term stability nosotros recommend applying a UV stable topcoat over them. Our other systems require a UV topcoat to resist degradation from the dominicus.
Coating Compatibility: Near types of coatings are uniform with epoxy. Thoroughly cured epoxy is an almost completely inert, hard plastic. About pigment solvents will not soften, swell, or react with information technology. Epoxy amines tin can affect i-office polyurethanes and polyester gelcoat. If you lot're using these, apply them after the epoxy is thoroughly cured, generally afterwards 2 weeks at room temperature, and after removing amine blush.
Elevated temperature post-curing will achieve a thorough cure much quicker. Postal service curing can too improve epoxy's thermal properties and is recommended if you plan to apply dark paint over epoxy.
Finish Coating Types
- Two-part linear polyurethane (LP) paints offer the most durable protection available. LPs are available every bit pigmented or clear coatings and offering excellent UV protection, gloss retention, abrasion resistance, plus compatibility with epoxy. However, compared to other types of coatings, they are expensive, require more skill to employ, and present a greater wellness hazard, especially when sprayed.
- Epoxy paints are bachelor in one-part and two-function versions. 2-part epoxies offering many characteristics similar to the higher performance polyurethanes. They are durable and chemical resistant but offer limited UV protection compared to the linear polyurethanes.
- One-function polyurethanes offering easy application, clean upwardly, and better UV resistance than alkyds. Be sure epoxy has cured thoroughly. Make a test console to ensure compatibility.
- Alkyd finishes—enamel, alkyd enamel, marine enamel, acrylic enamel, alkyd modified epoxy, traditional varnish, and spar varnish—offer ease of awarding, low cost, low toxicity, and piece of cake availability. Their disadvantages are low UV resistance and low chafe resistance. Make a test panel to ensure compatibility.
- Latex paints are largely uniform with epoxy, and they do an acceptable job of protecting the epoxy coating from UV degradation.

Source: https://entropyresins.com/how-to/resin-and-hardener-basic-instructions/
Posted by: christensonmolet1938.blogspot.com
0 Response to "How To Repair Epoxy Resin Top Coat On Stained Wood Floors"
Post a Comment